Sunday, March 18, 2018

Honeycomb Shawl ~ Free Crochet Pattern

This shawl can be worked in any yarn weight and made to any size, using any size hook. Enjoy!


Materials
Yarn weight is not important in this pattern; just use a hook size that will work with your yarn weight and create a fabric you like
-For the sample show:
-Worsted weight yarn, approximately 419 yards of the main color and 105 yards for the border
-J hook / 6mm
Tapestry needle to weave in ends

Stitches Used
Chain
Single Crochet
Half Double Crochet
Double Crochet
Front post SC (FPSC)
Front post and back post DC (FPDC / BPDC)

Gauge
Gauge is not important for this pattern. Work with a hook size that will work with your yarn.
-For the sample show:
1" = 3 stitches x 1DC and 1 SC row


Pattern
This pattern is worked from the bottom/tip of the shawl to the top/wider end of the shawl. You can make it as big or as small as you like and can stop at any point of the pattern. The shawl shown has a total of 30 open space rows. 

Body 
1. 2 SC in magic circle =2
2. Chain 3(this will always count as a stitch) and turn. DC in the same stitch. 2 DC in the next =4
This is the right side
3. Chain 1 and turn. 2 SC in the first stitch, 1 sc in each following stitches until the last. 2 SC in the last stitch = 6 
4. Chain 3 and turn. DC in the same stitch. DC in the next stitch. Chain 2, skip 2 stitches and DC in each following until the last. 2 DC in the last stitch =8
5. Chain 1 and turn. 2 SC in the first stitch, 1 sc in each stitch and 2 SC in each chain 2 space until the last stitch. 2 SC in the last stitch. REPEAT FOR EVERY ODD ROW
6. Chain 5. Skip 1 stitch. DC in the next 6 stitches. Chain 2. Skip the next stitch and DC in the last =12
8. Chain 3 and turn. DC in the same stitch. DC in the next 5. Chain 2 and skip two stitches. DC in the next 5 stitches. 2 DC in the last. =16
10. Chain 3 and turn. DC in the same stitch. DC in the next 3 stitches. Chain 2 and skip two stitches. DC in the next 6. Chain 2 and skip two stitches. DC in the next 3. 2 DC in the last. =20
12. Chain 3 and turn. DC in the same stitch. DC in the next stitch. (Chain 2 and skip two stitches. DC in the next 6) x 2. Chain 2 and skip two stitches. DC in the next. 2 DC in the last.
14. Chain 5. Skip 1 stitch. (DC in the next 6 stitches. Chain 2 and skip the next 2 stitches) x 2. DC in the next 6 stitches. Chain 2, skip 1 stitch and DC in the last
16. Chain 3 and turn. DC in the same stitch. DC in the next 5. (Chain 2 and skip two stitches. DC in the next 6) x 2. Chain 2 and skip two stitches. DC in the next 5 stitches. 2 DC in the last.
18. Chain 3 and turn. DC in the same stitch. DC in the next 3 stitches. (Chain 2 and skip two stitches. DC in the next 6) x 3.  Chain 2 and skip two stitches. DC in the next 3. 2 DC in the last.

* Continue to repeat rows 12-19(ending with an numbered row) to make the shawl as big as you like. The repetition of sections inside parenthesis increase by 2 with each additional pattern repeat.

Work 2 rows of HDC to finish the main body of the shawl.  Make 2 HDC in the first and last stitch of each row

Edging
1. With right side facing connect yarn to the corner on your left and chain 3. DC in same space. Work down the side of the shawl evenly by DC in every row or so, there is no exact number. The shawl and edge should lay flat/relaxed. I averaged 1 DC in each SC row and 2 DC in each DC row. 2 DC in each of the 2 tip stitches. Continue to DC up the other side of the shawl until you reach the last space, then 2 DC into that.
2. Chain 3(this counts as a stitch) and turn. BPDC in the next. Alternate between DC and BPDC down the side until you reach the middle two tip stitches. 2 DC in each stitch. Continue to alternate DC and BPDC up the other side of the shawl.
3. Chain 3 and turn. FPDC in each previously BPDC stitch and DC in each DC stitch. This will create ridges along the edging one the right side of the shawl. 2 DC in each of the middle 2 tip stitches. Continue up the other side of the shawl in the same fashion. If you would like your edging to be wider repeat rows 2 and 3.
4. Chain 1 and turn. 1 SC in each DC and 1 BPSC in each previous FPDC. Continue all around the shawl and finish off. * The stitch used for the edging may tend to curl a bit. Block if desired.


Friday, February 9, 2018

Fade to Blue Toddler Vest ~ Free Crochet Pattern

This is a very simple pattern that can be made in so many different color combinations! I personally love the fade effect. I made it for my son who wears 2T/24 month size, yet the pattern should be pretty easy to adapt. I would suggest using a piece of clothing to measure up against if altering size.


Materials
Worsted weight yarn in 4 complimentary colors
G hook / 4mm
Tapestry needle to weave in ends
Buttons; i used 12

Stitches Used
Chain
Single Crochet
Double Crochet

Gauge
1" = 3 stitches & 2 rows
Gauge for stitches per inch is most important. When row count is given, go by the measurement or what is closest to that as opposed to number of rows listed; i found that row gauge differs a lot more than stitch gauge. 

Pattern
This pattern is worked from the bottom to the top. If you want a fading effect like the pictured projects, start with the darkest color and work up to the lightest.


Body
With color #1
-Chain 79
-DC in the 4th chain(this chain 3 will NOT count as a stitch) and a DC in each remaining chain = 76 stitches (plus the beginning chain 3). The lenght should measure about 23.5”
-Chain 3 and DC in each stitch = 76 stitches (plus the beginning chain 3)
-Repeat the last row 2 more times. You should have a total of 4 rows in your first color. 
With color #2
-Chain 3 and DC in each stitch = 76 stitches (plus the beginning chain 3)
-Repeat the last row 3 more times. You should have a total of 4 rows in your second color.
With color #3
-Chain 3 and DC in each stitch = 76 stitches (plus the beginning chain 3)
-Repeat the last row 3 more times. You should have a total of 4 rows in your third color.
With color #4
-Chain 3 and DC in each stitch = 76 stitches (plus the beginning chain 3)
-Repeat the last row 1 more time or until the worked piece measures 8" from cast on.

Front Left
From here on the chain 3 at the beginning of each row WILL count as a stitch EXCEPT on the 2 edges of the project we have already established.
-Chain 3, DC in the first 7 stitches.
-Chain 3(this WILL count as a stitch on this side), DC in the following 6 = 7DC
-Chain 3, DC in the first 7 stitches.
-Repeat the last two rows 3 more times, you should have 9 rows worked or about 13.5". Leave tail long enough to sew the shoulder together(7 stitches) and cut yarn.

Back
Connect yarn to the body at the stitch next to the Front Left piece we have just completed. Chain 3(this WILL count as a stitch on both sides of the back) and DC for 35 stitches = 36 stitches
-Chain 3, DC for 35 = 36 stitches
-Repeat the last row for 7 more times. You should have 9 rows worked or about 13.5".  Leave tail long enough to sew the shoulder together(7 stitches) and cut yarn.

Front Right
Connect yarn to the body at the stitch next to the BACK piece we have just completed. Chain 3(this WILL count as a stitch on this side) and DC for 32 stitches = 33 stitches
-Chain 3(this will NOT count as a stitch on this edge), DC in the next 33 stitches. 
-Chain 3, DC in the next 32 stitches = 33 
-Repeat the last two rows 3 more times. You should have 9 rows worked or about 13.5".  Finish off and cut yarn.


Finishing Off
Fold over the thin edge and align to the back. Sew 7 stitches with tail.
Fold over the front right and align with the back. Sew 7 stitches with tail.
The front right side should overlap the left side on about 3-4 stitches. Sew buttons along the short side, the spaces between the DC will serves as button holes on the other side. I put a button about every 2 rows and used the appropriate color in the pictured projects. Because we are using the DC spaces as button holes, it's easy to adjust and tighten or loosen up the sweater as you see fit. I also found that the neck hole is large enough to easily fit over the head instead of having to actually undo all the buttons every time. Enjoy, i hope your kiddo enjoys wearing this!


Wednesday, January 24, 2018

Triforce Cowl ~ Free Knit Pattern

First pattern of 2018! This is a very basic cowl, the triforce motif is the real design in this piece. If you are not aware of what the 'triforce' is, then you're probably not a Zelda fan(one of my favorite video game series). The triforce is the main source of power and what the good and bad are seeking in most of the games. The 3 triangles represent power, wisdom and courage. I would suggest checking them out!


Originally i wanted to post only the chart but it seems like Ravelry has stricter restrictions on charts nowadays, so i decided to write the pattern to this cowl and post it that way. With that said, my intention was to make the chart accessible so anyone could use it on anything. It would make an awesome baby blanket for example, or on finger-less mitts(which i'm tempted on doing). 

Triforce Cowl

Materials
Worsted weight yarn 
US 6/ 4mm needles
Stitch markers
Tapestry needle to weave in ends

Gauge
1" = 4 stitches
Please check gauge, mine is very loose.


Chart
The chart is 14 stitches x 12 rows


Pattern
-Cast on 84 stitches; work in the round
-Work 2x2 ribbing for 6 rows or approximately 1"
-Knit for 4 rows. Place stitch markers between every chart(every 14 stitches), there should be 6 sections
-Work chart on 1, 3 and 5th section/chart space and knit in the other sections
-Knit for 3 rows
-Work chart on 2, 4 and 6th section/chart space and knit in the other sections
-Knit for 3 rows
-Work chart on 1, 3 and 5th section/chart space and knit in the other sections
-Knit for 4 rows
-Work 2x2 ribbing for 6 rows or approximately 1"
-Cast off

*The pattern is being tested at this time, i will update/make corrections accordingly. If there's an error please let me know! :)


Thursday, January 18, 2018

New Year, New Blog!

It's been quite a while since i've posted something new. I took some time to browse my last posts and they make me so happy and a little sad as well, that it stopped so suddenly. My videos have also taken a break until more recently(check out my YT channel for anything new). Things got left at a standstill once my son was born, so it's been about 2 years ~ he turns 2 in April. That seems impossible, it's really true that time flies! Now that i have a very busy and curios toddler to look after and share my time with, i probably won't be posting my current wips or videos as i once did. However this year i plan to focus on writing patterns or coming up with new techniques/ideas which i will be sharing here. My goal is one a month, so hoping that 12 this year will be the minimum! I have my first design, a motif inspired by one of my favorite game series, almost ready to go(it will be free and posted in Ravelry apart from posting here as well). Look for that in the near future! :)

Sunday, March 13, 2016

Wips, Fo's and Some Chatter... Malon Makes! 1:2


Yes...another update with more than a couple of finished items! A couple of hats, completed my handspun cowl and finally finished the final project inspired by the last game i completed last year(Yoshi's Wooly World). I worked up a tunisian crochet Invaders inspired pillow(almost done), a pair of bootees and an oversized/giant version of a baby rattle...i found this specially hilarious. I also managed to chat quite a bit about life stuff and shared my baby registry with you(https://babyli.st/malonb) so if interested in that check out the video below.


Monday, February 29, 2016

Tiny Knits & Crochet Projects... Malon Makes! 1:2


I have many mini/small completed projects this time around. I have a few hats, some bootees, a sweater and a pair of mitts. I'm also currently making a cowl with some handspun, my Feb yarn pick for the month. I chose my pick for March as well(with help from my Instagram friends) and this time it's a Bernat Mosaic skein in the colorway 'Mineral'.., i believe i do have two additional skeins in my stash may i need it. Check out my video for more blurb and detailed views of my projects(you can also find them in my Ravelry).


Monday, February 15, 2016

Malon Makes! Baby FO's and Current WIP's - 1:1


I got a few finished projects this time around. The bulk of it has been baby items; i completed a sweater, a cocoon and hat set, bootees and have dyed yarn for a specific project i've yet to choose. It was my first time using RIT dye on wool and i'm pretty satisfied with the depth of color. Unfortunately my skeins(super-wash merino) had a few breaks in the yearn; i'm not sure why however it was definitely done before they were passed on to me. It looks like they got caught on something which snapped a few of the singles so i ended up with two multiple cakes for each(and a tiny extra bit for the blue as you can see). I also have a few baby items in the works and am looking for other projects i may want to cast or hook on.


Last but not least, i completed a cute amigurumi unicorn and am thinking of making another blanket perhaps or a large amigurumi/plushy he(soon to be here bundle of joy) can drag around eventually. Coming up with a character to make is pretty hard as there's so many and who knows what he'll be into! On the other side i might just make as many as my heart desires and let him choose which to keep... :) Check my video for more blurbs; find my links in the video description box!

Sunday, January 31, 2016

3 FO's and a Couple of WIP's

This update consists of 2 adorable crochet baby hats and a cowl using some of my handspun(this was my monthly yarn pick for January). Both hat patterns are free(check out my ravelry project pages) and i didn't use a pattern for the cowl but i have details/notes in my project page if interested.  I also chose the monthly yarn pick for February and it's some more of my handspun! It's a gray/yellow colorway which i love, i already know this will be something for me, i just can't decide if i want a hat, finger-less mitts or another cowl. We shall see!

There's also a few future projects i hope to get to these next few weeks, including some baby booties, a knit hat for the kid(at least one) and maybe something for myself :) I also have a couple of rainbow skeins i wanted to use in order to join a few knit/crochet alongs this month... rainbow-along if you please(love that title lol) but again i have no idea what to make. I'm browsing ravelry as we speak! Check out my vid for more details.

Wednesday, January 20, 2016

Nintendo Baby Blanket, Llama and Misc.

I finally finished the ? Block Nintendo inspired baby blanket and i'm so excited! It took a while but it's done and it looks great to boot. I'll be waiting closer to April to give it a final wash so it's ready for use :). Since my last update i also whipped up a cute amigurumi llama(find links in the video description, this was a free pattern) as well as a knit hat, ear warmer and have a couple of things in the works. Overall i've fell into a lazy state recently and don't want to do much, however at the least i can sit back and do a row or two here and there on whatever project i happen to be working on. Hoping to have something to show next time! View the video for more blurbs and some channel and life updates.


Friday, January 8, 2016

Monthly Yarn Club ~ 2016 (& 2015 wrap up)

Last year was the first that i did the personal monthly yarn club. The concept is picking 12 skeins(i picked some from my existing yarn stash) and picking one at random every month to use for a project. I'm doing the same this year.

2015 was pretty exciting in all sorts of ways. I got the biggest news ever; i'm expecting and waiting patiently for my bundle of joy to arrive this April. I also almost reached my goal of beating/completing 1 game a month(i did 10) which is a huge improvement from previous years. As far as the monthly yarn club goes, i was 3 shy of reaching my goal and i didn't technically finish all the projects for the used skeins either(a couple are still in the works making them WIPs. Completed projects weren't a requirement however). You can check out more details in my 2015 yarn club blog post here. I listed the yarn details as well as what month i picked the yarn and linked to my ravelry project page and pattern where applicable... i will be doing the same here as well. To view more blurbs, see my fave projects and view this yarn live check out my video below.


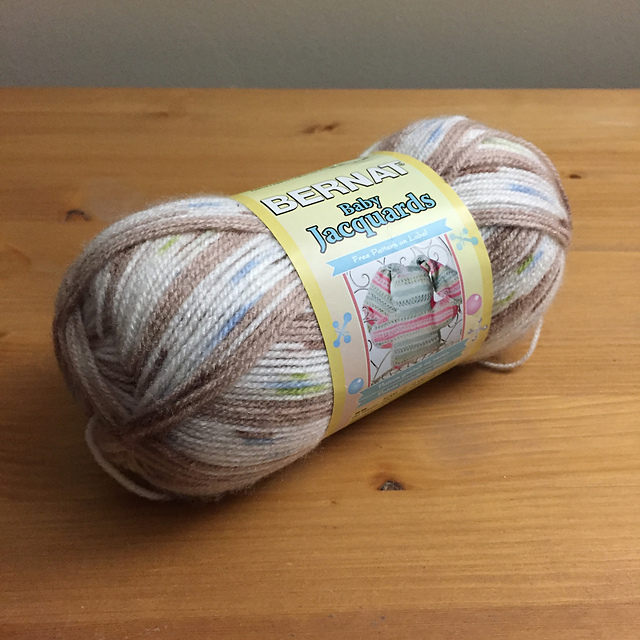
Baby Jacquards by Bernat
Macaroon
Discontinued
346 yards / 100 grams
90% Acrylic, 10% Nylon


Mosaic by Bernat
Mineral
Discontinued
209 yards / 100 grams
100% Acrylic


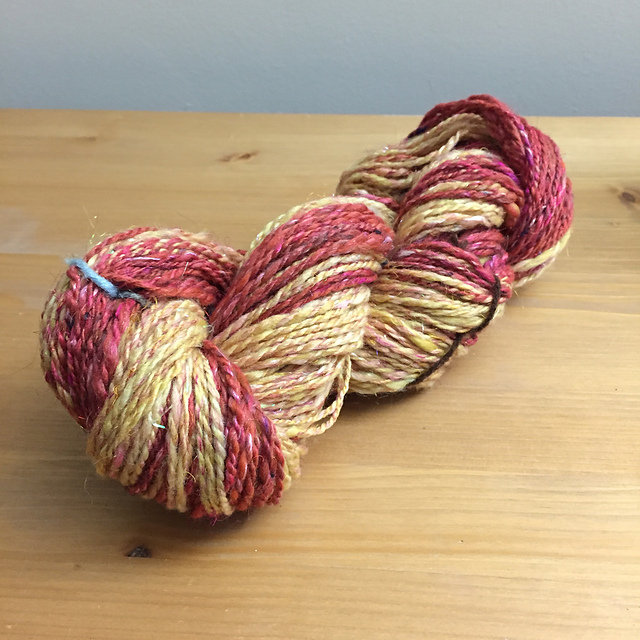
Harris Banana Glama Gradient
Yellow/Orangy-Red
Handspun, OoaK
202 yards / 3.6oz
Merino blend with various fibers


Wool-Ease by Lion Brand
Weath
197 yards / 85 grams
100% Acrylic


LoZ: Link
Link (green)
Unknown yardage, weight or type of wool
Will calculate yardage when picked
2 skeins


Merino Single Ply by Scandinavian Weave and Knit
Fire Opal
215 yards
100% Merino


Northern Worsted by SMC
Discontinued
Santa Fe
230 yards / 100 grams
100% Acrylic


Seamist
Multi-color
Handspun, OoaK
240 yards total / 4oz
Wool/Silk blend
2 skeins
January Pick!


Old Mill Yarn Ewe in Browns
Shades of brown
195 yards
100% Wool


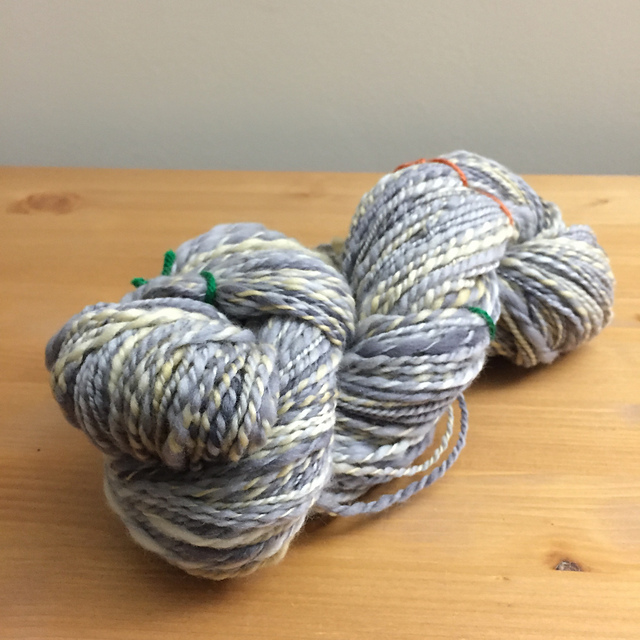
Spellbook
Gray/cream/yellow
Handspun, OoaK
270 yards / 4oz
100 % Superfine Merino


Stargazer Lilly
Pink/Yellow
Handspun, OoaK
198 yards / 4oz
100% Merino


Alpcaca/Merino Blend
Natural/brown
Handspun, OoaK
48 yards / 3.95oz
70% Alpaca, 30% Merino