Showing posts with label Crochet Pattern. Show all posts

Wednesday, March 18, 2015

DIY - Free Pattern ~ Mini Mushroom Crochet Amigurumi

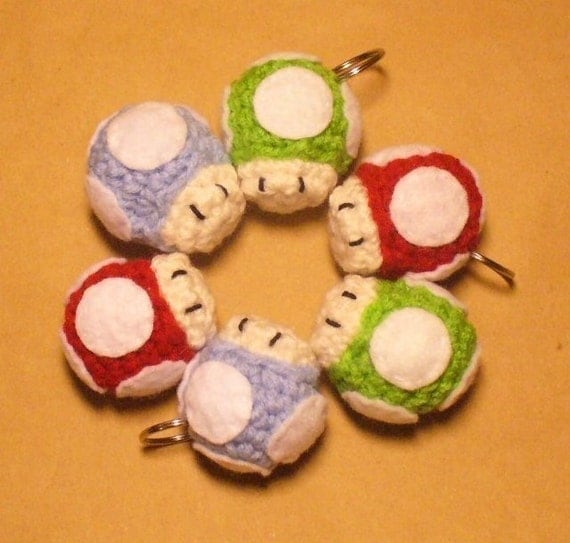
These cute mushrooms were inspired by the Super Mario video game series. Why so tiny? 'Cause why not! This takes no time at all and yields some adorable results. I've made magnets and keychains from this cute amigurumi which i offer on my Etsy shop individually(view them here) as well as in sets of 3(view them here).

Top:
  1. 5 in magic circle - 5 stitches
  2. Increase all - 10
  3. (1sc, 1 increase) repeat - 15
  4. (2sc, 1 increase) repeat - 20
  5. Sc all - 20
  6. Sc all - 20
  7. (2sc, 1 decrease) repeat - 15
  8. Finish off and leave a long tail (will be used to sew the top to the bottom of the mushroom)

Bottom:
  1. 10 in magic circle - 10 stitches
  2. (1sc, 1 increase) repeat - 15
  3. Sc all - 15
  4. Finish off
Stuff the top with fiberfill (or your choice of filling/stuffing) and thread the tail through a yarn needle. Match up the knots of the top and bottom piece before sewing together with your preferred sewing stitch(you can view my method on the tutorial video here).

Finish:

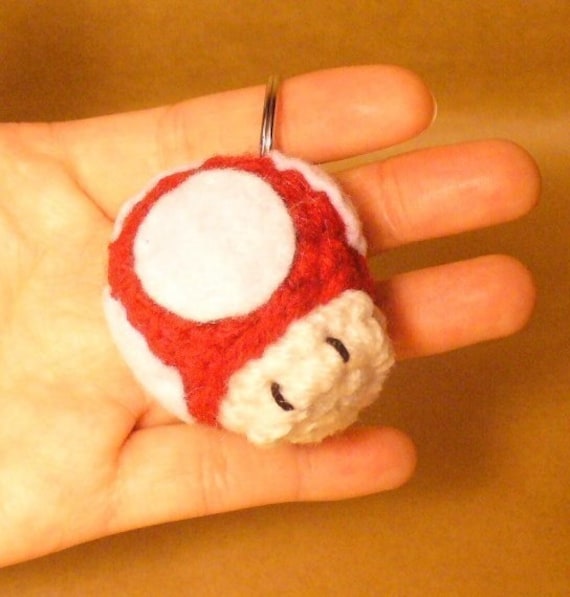
I used felt spots for my amigurumi which are about the size of a US quarter(approx 24.25mm). I glued and embroidered mine on, however either/or is enough. You can also crochet the spots, needle felt them on, use different fabrics, embroider them, or not include any at all.... so many options and it's totally up to you!

I embroidered eyes on mine to resemble the video game characters a little closer. Crochet thread was my choice(is what i had in my yarn stash), but you can use yarn, regular thread, cut the eyes out of fabric, or choose not to include them.

Want to turn then into magnets or keychains? I show you how at the end of my video tutorial(click here to view from that point!)

That is all ~ your cute amigurumi should be complete! Please feel free to sell/gift/share the items you make with this pattern but please don't take credit for the design. Do not distribute or sell this pattern as your own, but do share the link to this blog with those interested. Thank you! :)

Wednesday, November 12, 2014

Amigurumi Power-Up Mushroom - Free Pattern

Amigurumi Power-Up Mushrooms
by Malon Bruce

This pattern is worked in the round. It’s rather simple since it only uses the basic single stitch(st), slip stitch(sl), increase(inc) and decrease(dec) stitches. I also like to use the ‘magic circle’ technique to start off but it’s not necessary. You could simply chain 2 and work row 1 in the 2nd stitch from hook.


Materials:

  • Red/Blue/Green/Purple yarn(depending on which mushroom you are working on)
  • White yarn for the bottom portion
  • Felt for the spot details
  • Fabric paint/needle and thread to sew/glue on spots
  • Black yarn/crochet thread for the eyes
  • Embroidery needle
  • Fiberfill (or you filling of choice)
  • H hook (use your preferred size to make a fabric tight enough so the stuffing doesn't show through
  • Stitch markers/something to mark your rows with(I used scrap piece of yarn)

Top:
1. 6 in magic circle =6
2. increase all =12
3. increase all =24
4. *1st, 1 increase* repeat =36
5.-11. sc st for 7 rows =36
12. *1sc, 1 decrease* repeat =24
13. *2sc, 1 decrease* repeat =1814. Finish off and leave a long tail to sew to the bottom.

**At this point make sure to COUNT the number of stitches you have. I have ended up with less/more plenty of times due to unknown increase/decreasing. The exact number does not matter as much as knowing how many there are so you know how to adjust the bottom part of the mushroom. This will make the sewing go ever so smoothly and will let you match up stitch per stitch.

Bottom:
1. 6 in magic circle =6
2. Increase all =12
3. *6 st, 1 increase* repeat (this is where you would inc/dec in order to match the number of stitches you ended up with on the top) =18
4. Sc all =18
5. Turn work around and st 9 creating ‘tab’ =9
6. Slip stitch and finish off.

** The ‘tab’ here will be the face of the mushroom and give the top a slanted look. Make sure you only sew the actual stitches together and don’t count the side of the tab as a stitch.

Putting it all together:
Now you put both pieced together and sew away! The matching number of stitches makes it easy; and don’t forget to stuff before you close up your work. Keep in mind the ‘tab’ on the bottom part of the mushroom will serve as the face, so I usually like to have the finished off end of the top centered on the back for a more clean and finished look.

Eyes: I used black crochet thread, but any yarn/embroidery thread will do. You can also use felt, fiber paint, buttons, it's up to you. Position eyes about 2 stitches apart (use pictures as a guideline).

**I glued on the felt spots and embroidered around them for reinforcement. It’s not necessary, you could do one or the other.

Spots: For the red/blue/green mushrooms I made my spots out of felt and about1 ½ inches(or 4mm) in diameter. You will need 5 spots per mushroom. Center one on the top and put the other 4 around in a uniform fashion.

For the poison mushroom i used felt for the skull and crochet thread to embroider the ‘teeth’. I also painted on the eyes/nose with 3d fabric paint before gluing and embroidering on but you can definitely sew them on use felt.


This is an original pattern by Monica Jeriah (August 2009). Please do not claim this pattern as your own,
make copies of or publish on any CD, collection, publication or website without permission. Buying this
pattern gives you the right to use it for your own personal use but you may not sell or distribute it, or sell
any items made from this pattern. Photos are also property of Monica Jeriah.

Friday, November 7, 2014

Amigurumi Princess Ornament- Free Pattern

This cute ornament emerged from a fairy-tale swap i participated on recently. One of my partner's favorite fairy tale characters was Snow White(the Disney princess version...i guess there is such a thing!). This swap being so close to the holiday season, well that's how the whole 'ornament' idea came about. :)
It's quite a simple pattern that can be altered to your needs/taste. I used a 2" styrofoam ball for this one but you can stuff it with fiberfill(etc) as well. I used ribbon and yarn for the bows but again, it's up to you how you choose to style the hair(or not). My ornaments have their face embroidered on(the cheeks and lips) except for the eyes, which i used two tiny dots of fabric paint for. 
I chose not to explain every little thing in the tutorial since learning the real basics(ie what is an 'increase'?) can be easily found/learned via other tutorials and so forth.  Enjoy!


Face
  1. 6 sc in magic circle - 6
  2. Inc all stitches - 12
  3. (1sc, 1 increase)* (repeat for the whole row) - 18
  4. (2sc, 1 increase)* - 24
  5. (3sc, 1 increase)* - 30
  6. Sc in all stitches - 30
  7. Sc in all stitches - 30
  8. (3sc, 1 decrease)* - 24
Finish off, no tail needed

Hair
  1. 6 sc in magic circle - 6
  2. Inc all stitches - 12
  3. (1sc, 1 increase)* (repeat for the whole row) - 18
  4. (2sc, 1 increase)* - 24
  5. (3sc, 1 increase)* - 30
  6. Sc in all stitches - 30
  7. 3 sc, (2hdc, 4dc, 2hdc, 2sc)x2, 7 sc - 30
Finish off, leave a long tail for sewing to face

Sewing Together 
Fit the hair and face over the styrofoam ball so the ends overlap. Position the hair to your liking and sew to the face. Add a bow and embroider the face. Done!
*I show some bonus footage at the end of the video on how i add the loop on the ornament.

Sunday, July 6, 2014

Lion Brand - Envelope Flatware Holder Tutorial

It's finally complete! The pattern is super easy and super quick. It's also pretty easy to adjust the size of your project as well as change up the stitches(if you don't happen to like single crochet). The pattern calls for a G hook(4mm) and Vanna's Choice(worsted weight yarn), but any type will do...great stash buster!

I made a few, including a super small one and it turned out adorable! The concept of the pattern is very simple; all you're really making is a square(which you then fold up into an envelope) so really, any yarn or stitch regardless how big or small will work as long as you end up with a square piece of fabric.

If you check out the projects on ravelry for this pattern,  you'll also find many other different closures others have done. The heart is a very cute idea, however i would suggest taking a browse there to get more awesome ideas.

Check out my pics...am i right?! They're pretty cute! You can find the pattern on the Lion Brand website here: http://www.lionbrand.com/patterns/80017AD.html 


Sunday, May 25, 2014

DIY - Crochet Salmon Sushi Roll-Up Scarf

Sushi is pretty popular nowadays, so I thought I would pay homage. I'm personally not a fan but plenty of the people in my circles are and would definitely dig this scarf. It's super simple and adaptable as well- have fun win it! UPDATE: I now have a knit version as well; you can find it here!

I made a concept video on how the scarf is made; in short it's simply a stripped scarf that can be made with many/any stitch, fiber, yarn weight, color and it's up to you whether you hook it, knit it, loom it, sew it, the possibilities are endless really. 


The scarf i made used Red Heart and scraps of yarn I had in my stash. I used an H hook and did double crochet all throughout. I decided to make mine 20 stitches wide which made it about 7 inches. When complete, it was almost 7 feet long(save an inch). How long or wide you make it is also up to you, obviously :) .


For those who are fans of patterns I'm including the info for the specific scarf I made in the video. It's not exactly a pattern but gives you something to follow, and can adjust accordingly. I'm also including the approximate measurement of each individual color sections for reference(i do recommend rolling up your own scarf and changing colors accordingly). 

I started with the center of the scarf(aka filling)

Pink/salmon color - 25 rows (15.5")
Yellow/orange - 13 rows (8.5")
Green - 4 rows (3")
White - 9 rows (6.5")
Green - 4 rows (3")
White - 13 rows (8.5")
Green - 4 rows (3")
White - 29 rows (20") 
Black - 23 rows (16")

Once complete simply weave in the ends and you're done!


Tuesday, February 18, 2014

Piranha Plant Pattern (+ tutorial)

This pattern is pretty easy and quick. I used red heart super saver but of course, you can choose a yarn of your choice ~ gauge is not important. I made a banner/bunting using i-chord, however you can use anything from braided/chained yarn to rope or ribbon...the options are endless! This tutorial isn't perfect. I mix up half-double crochet with double crochet a few times so try to overlook those....I suggest going by the pattern as well. Enjoy!


Before i go on, please excuse the bad pictures(i wasn't very sure i would include these in). I first made all yarny parts of my bunting and put them together. I then placed my piranhas someplace where they would be undisturbed so the details could dry overnight. Finally...my project was complete...ta-da! :)


Materials:
Yarn
H(5mm) crochet hook
Felt
Fabric glue


Piranha Patter and Leaf
Piranha: 
magic loop
sc 5, turn - 5
ch 2, 2dc in same. 3dc in rest, turn - 15
ch2, 2dc in same. repeat 2dc in next, 3dc in next until last stitch 2dc in last stitch - 35
Leaf: 
chain 5
slip stitch on 1st chain, 1sc,1dc,1sc, chain 2 turn
1sc,1dc,1sc,1sl