Showing posts with label tutorials. Show all posts

Wednesday, March 18, 2015

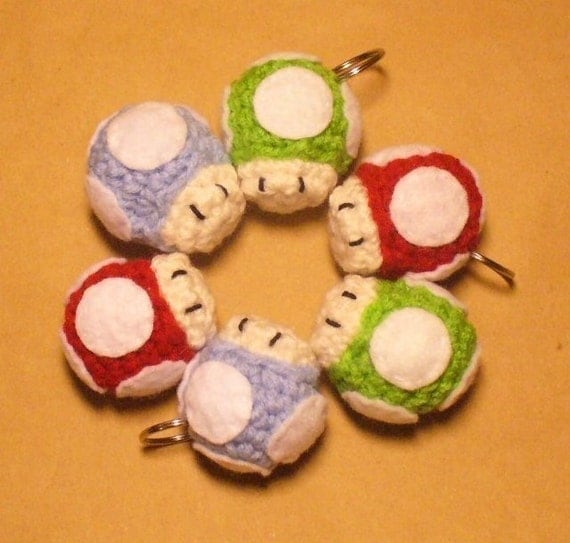
DIY - Free Pattern ~ Mini Mushroom Crochet Amigurumi

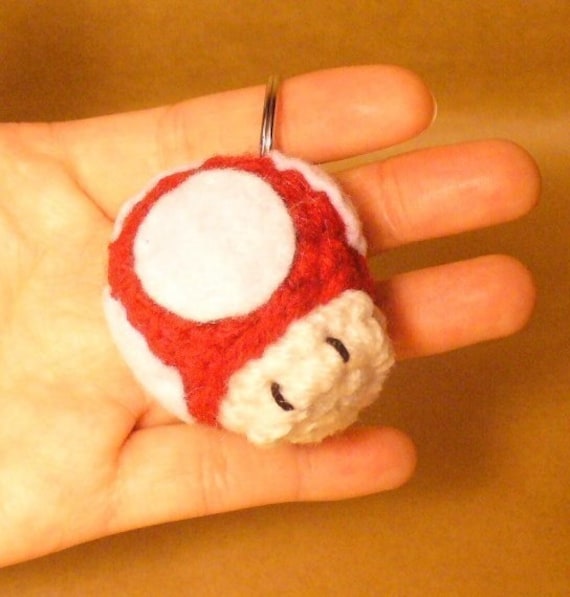
These cute mushrooms were inspired by the Super Mario video game series. Why so tiny? 'Cause why not! This takes no time at all and yields some adorable results. I've made magnets and keychains from this cute amigurumi which i offer on my Etsy shop individually(view them here) as well as in sets of 3(view them here).

Top:
  1. 5 in magic circle - 5 stitches
  2. Increase all - 10
  3. (1sc, 1 increase) repeat - 15
  4. (2sc, 1 increase) repeat - 20
  5. Sc all - 20
  6. Sc all - 20
  7. (2sc, 1 decrease) repeat - 15
  8. Finish off and leave a long tail (will be used to sew the top to the bottom of the mushroom)
Bottom:
  1. 10 in magic circle - 10 stitches
  2. (1sc, 1 increase) repeat - 15
  3. Sc all - 15
  4. Finish off
Stuff the top with fiberfill (or your choice of filling/stuffing) and thread the tail through a yarn needle. Match up the knots of the top and bottom piece before sewing together with your preferred sewing stitch(you can view my method on the tutorial video here).

Finish:

I used felt spots for my amigurumi which are about the size of a US quarter(approx 24.25mm). I glued and embroidered mine on, however either/or is enough. You can also crochet the spots, needle felt them on, use different fabrics, embroider them, or not include any at all.... so many options and it's totally up to you!

I embroidered eyes on mine to resemble the video game characters a little closer. Crochet thread was my choice(is what i had in my yarn stash), but you can use yarn, regular thread, cut the eyes out of fabric, or choose not to include them.

Want to turn then into magnets or keychains? I show you how at the end of my video tutorial(click here to view from that point!)

That is all ~ your cute amigurumi should be complete! Please feel free to sell/gift/share the items you make with this pattern but please don't take credit for the design. Do not distribute or sell this pattern as your own, but do share the link to this blog with those interested. Thank you! :)

Saturday, December 13, 2014

DIY - Knit Ribbed Salmon Sushi Roll-Up Scarf

I'm back with a knit ribbed version of the Salmon Sushi scarf! I previously made a post(and video tutorial) for a crochet version of this scarf(check it out here); it seems pretty popular so thought i would make a knit version. I wanted to make it reversible and wanted to do something other than garter stitch(all thought i may have one on the works, shh...) and decided on 3x3 ribbing.

This is more of a guideline to make a scarf, this is a very simple 'pattern' that is very easily adapted to your needs/likes; in short it's simply a stripped scarf that can be made with many/any stitch, fiber, yarn weight, color and it's up to you whether you hook it, knit it, loom it, sew it, the possibilities are endless really. 

The scarf i made used Red Heart Super Saver(worsted weight). I used US sive 5/3.75mm needles and did 3x3 ribbing(which makes it reversible). I decided to make mine 24 stitches wide which made it about 3 inches. When complete, it measures about 6'2" (74 inches) long. How long or wide you make it is also up to you, obviously :) .


These are the specifics for the scarf pictured. It's not exactly a pattern but gives you something to follow and can adjust accordingly. I'm also including the approximate measurement of each individual color sections for reference(i do recommend rolling up your own scarf as you go and change colors as you see fit, as there are many factors which can change your tension and gauge while working on this project).


I started with the center of the scarf(aka filling)


Pink/salmon color - 80 rows (16.5")
Yellow/orange - 45 rows (10")
White - 13 rows (2.5")
Green - 11 rows (2")
White - 46 rows (10.5")
Green - 11 rows (2")
White - 35 rows (7.5") 
Black - 80 rows (19")

Once complete simply weave in the ends and you're done!

Friday, November 7, 2014

Amigurumi Princess Ornament- Free Pattern

This cute ornament emerged from a fairy-tale swap i participated on recently. One of my partner's favorite fairy tale characters was Snow White(the Disney princess version...i guess there is such a thing!). This swap being so close to the holiday season, well that's how the whole 'ornament' idea came about. :)
It's quite a simple pattern that can be altered to your needs/taste. I used a 2" styrofoam ball for this one but you can stuff it with fiberfill(etc) as well. I used ribbon and yarn for the bows but again, it's up to you how you choose to style the hair(or not). My ornaments have their face embroidered on(the cheeks and lips) except for the eyes, which i used two tiny dots of fabric paint for. 
I chose not to explain every little thing in the tutorial since learning the real basics(ie what is an 'increase'?) can be easily found/learned via other tutorials and so forth.  Enjoy!


Face
  1. 6 sc in magic circle - 6
  2. Inc all stitches - 12
  3. (1sc, 1 increase)* (repeat for the whole row) - 18
  4. (2sc, 1 increase)* - 24
  5. (3sc, 1 increase)* - 30
  6. Sc in all stitches - 30
  7. Sc in all stitches - 30
  8. (3sc, 1 decrease)* - 24
Finish off, no tail needed

Hair
  1. 6 sc in magic circle - 6
  2. Inc all stitches - 12
  3. (1sc, 1 increase)* (repeat for the whole row) - 18
  4. (2sc, 1 increase)* - 24
  5. (3sc, 1 increase)* - 30
  6. Sc in all stitches - 30
  7. 3 sc, (2hdc, 4dc, 2hdc, 2sc)x2, 7 sc - 30
Finish off, leave a long tail for sewing to face

Sewing Together 
Fit the hair and face over the styrofoam ball so the ends overlap. Position the hair to your liking and sew to the face. Add a bow and embroider the face. Done!
*I show some bonus footage at the end of the video on how i add the loop on the ornament.

Sunday, July 20, 2014

Yarn Organization Before & After

I have finally finished organizing most of my yarn stash. I must admit there's a few skeins still floating freely here and there, which tends to happen when there are WIPs to account for, but the majority now has a set place. It took a weekend of work overall, but was well worth it! If you have seen my previous yarn stash videos then this one pretty much says it all.... however i'm posting a few more pics here for your enjoyment. 

 These is my before and after. It began with a chaotic mess. Skeins where stashed places simply because they fit, with no sense of belonging at all. Having two layers to each cube didn't help either, since once a yarn was stashed behind the others it was more than likely forgotten... :(

Before it came to organizing i had to empty everything out and i decided it to sort it by types of fiber...and then by colors(somewhat..). It made me realize what i actually had, which is A LOT, and most of it is good quality yarns. Why or how did i come to get this stash? I don't know, but because i 'found' so much i decided to go on a yarn diet until November, Thanksgiving season(i can't see myself passing up black Friday deals). I also found i had more than enough in my library, specially when it comes down to knitting. Add ravelry and/or free patterns online and it's totally endless. I'm including books/mags in my 'diet', of course.


I found i have a lot of cotton which isn't my preferred type of yarn. All though i never worked with it much honestly, i now have plenty to work with. I'm unsure if cotton yarn stretches or shrinks. I remember reading about it before(not very lately thou) and i got mixed reviews. The safest thing to do is make a swatch and see for myself i suppose. Not to mention the large amount of acrylic and acrylic blends. Red Heart is by far the most used yarn in my stash, but once i learned how to knit i've acquired a taste for the finer(and softer) ones.

I know there's a saying that goes somewhere along the lines of 'Life's too short to use acrylic'... and i think they're right! Even though nowadays acrylic isn't all bad, there are some very soft and amazing yarns which i would definetly keep on using. More recently i found that Vanna's Choice and Michael's Loops and Threads brands are some of my favorites. I also have a lot of colorways which are only 'one skein'. There's so many things that would only take that amount, yet the yardage(or lack of) does limit you somewhat. I can only make so many cowls or hats, right?

Sunday, July 6, 2014

Lion Brand - Envelope Flatware Holder Tutorial

It's finally complete! The pattern is super easy and super quick. It's also pretty easy to adjust the size of your project as well as change up the stitches(if you don't happen to like single crochet). The pattern calls for a G hook(4mm) and Vanna's Choice(worsted weight yarn), but any type will do...great stash buster!

I made a few, including a super small one and it turned out adorable! The concept of the pattern is very simple; all you're really making is a square(which you then fold up into an envelope) so really, any yarn or stitch regardless how big or small will work as long as you end up with a square piece of fabric.

If you check out the projects on ravelry for this pattern,  you'll also find many other different closures others have done. The heart is a very cute idea, however i would suggest taking a browse there to get more awesome ideas.

Check out my pics...am i right?! They're pretty cute! You can find the pattern on the Lion Brand website here: http://www.lionbrand.com/patterns/80017AD.html 


Tuesday, May 27, 2014

Dip Dye Yarn ~ LoZ: Link and Zelda Colorways

Dying yarn is one of the most awesome things, as well as coming up with different colorways. Of course, i had to make some Zelda inspired. I have dyed a few other characters as well(lol), but this time around i'll be showing you Link and Zelda specifically.

To note, i prefer to dye superwash wool(as i don't have to worry about mishandling since it won't felt), yet when doing the Link colorway i did a bulky non-superwash 100% wool skein as well. I used liquid food coloring dyes(the neon and regular variety), vinegar & water, pyrex glass containers and the microwave as my heat source. I didn't note the amount of water or vinegar i generally used in each dye bath, but did note the amount of dye for each.

You can see my setup from the pictures, and how i divided the skeins into each dye bath. You'll also see the skeins before and after re-spinning :).


Zelda Colorway
Dusty Rose(dark pink):
Red - 36 drops
Blue - 12 drops

Pink:
Neon Pink - 13 drops

Yellow:
Yellow - 13 drops


Link Colorway
Green:
Neon green - 75 drops

Yellow:
Yellow - 20 drops

Brown:
Red - 10 drops
Yellow - 10 drops
Green - 10 drops
Blue - 10 drops
Black - 1 drop


These are finally up at my etsy shop! Find them here;
Zelda Colorway
Superwash Link Colorway
Bulky 100% Wool Link Colorway

Note: There is no right or wrong way to dye yarn or fiber. You can use any kind of dye, apply as much or as little as you want, anywhere and/or anyhow...etc you get my drift.

Sunday, May 25, 2014

DIY - Crochet Salmon Sushi Roll-Up Scarf

Sushi is pretty popular nowadays, so I thought I would pay homage. I'm personally not a fan but plenty of the people in my circles are and would definitely dig this scarf. It's super simple and adaptable as well- have fun win it! UPDATE: I now have a knit version as well; you can find it here!

I made a concept video on how the scarf is made; in short it's simply a stripped scarf that can be made with many/any stitch, fiber, yarn weight, color and it's up to you whether you hook it, knit it, loom it, sew it, the possibilities are endless really. 


The scarf i made used Red Heart and scraps of yarn I had in my stash. I used an H hook and did double crochet all throughout. I decided to make mine 20 stitches wide which made it about 7 inches. When complete, it was almost 7 feet long(save an inch). How long or wide you make it is also up to you, obviously :) .


For those who are fans of patterns I'm including the info for the specific scarf I made in the video. It's not exactly a pattern but gives you something to follow, and can adjust accordingly. I'm also including the approximate measurement of each individual color sections for reference(i do recommend rolling up your own scarf and changing colors accordingly). 

I started with the center of the scarf(aka filling)

Pink/salmon color - 25 rows (15.5")
Yellow/orange - 13 rows (8.5")
Green - 4 rows (3")
White - 9 rows (6.5")
Green - 4 rows (3")
White - 13 rows (8.5")
Green - 4 rows (3")
White - 29 rows (20") 
Black - 23 rows (16")

Once complete simply weave in the ends and you're done!


Tuesday, February 18, 2014

Piranha Plant Pattern (+ tutorial)

This pattern is pretty easy and quick. I used red heart super saver but of course, you can choose a yarn of your choice ~ gauge is not important. I made a banner/bunting using i-chord, however you can use anything from braided/chained yarn to rope or ribbon...the options are endless! This tutorial isn't perfect. I mix up half-double crochet with double crochet a few times so try to overlook those....I suggest going by the pattern as well. Enjoy!


Before i go on, please excuse the bad pictures(i wasn't very sure i would include these in). I first made all yarny parts of my bunting and put them together. I then placed my piranhas someplace where they would be undisturbed so the details could dry overnight. Finally...my project was complete...ta-da! :)


Materials:
Yarn
H(5mm) crochet hook
Felt
Fabric glue


Piranha Patter and Leaf
Piranha: 
magic loop
sc 5, turn - 5
ch 2, 2dc in same. 3dc in rest, turn - 15
ch2, 2dc in same. repeat 2dc in next, 3dc in next until last stitch 2dc in last stitch - 35
Leaf: 
chain 5
slip stitch on 1st chain, 1sc,1dc,1sc, chain 2 turn
1sc,1dc,1sc,1sl


Friday, January 31, 2014

Felted Dryer Balls ~ DIY

Recently i checked out this page(blog?) regarding dryer balls(http://www.diynatural.com/how-to-make-wool-dryer-balls/). It was intriguing since they have a list of positives(no negatives? maybe the price of yarn) and they seemed pretty fun to make. In simpler terms; wind up the yarn into a ball, throw it in the wash to felt and dry....ta-da!...end of story.


I made a vid on my process(of course) where i dyed the top layer of 5. I added a 6th ball to finish up the partial skein i had left. It used up quite a bit of yarn, i haven't put them to use yet but soon...lol.


These are said to replace fabric softener, decrease drying time and help increase fluffiness while reducing static among other things. You would throw them in the dryer and while bouncing around with your clothes that would help the hot air circulate cutting down on drying time. As with most things, the more the merrier(and the bigger the better i assume lol).


Wednesday, January 1, 2014

Yarn Un-Crimping *~*

I purchased these awesome 'skeins' of yarn during the black friday/cyber monday sales. The yarn itself had been knitted up in panels and then dyed..and sold this way! Via the instructions/directions they recommended working straight from the panel, meaning no re-skeining and/or cake making...of course they also recommended blocking your project after it was complete. I started to make a scarf/shawl and during the process it was obvious the crimp/kink of the yarn just got in the way. It was hard to manage, not to say the crimp made the yarn shrink on itself and even tension wasn't at all possible. And so began my journey...


I can't say i'm 100% satisfied with it, but it's a major improvement. I'll be making one into a cake in the near future and test it(if all is good, the 2nd will follow). I probably won't be going for the shawl i was working on earlier, all tho i may just try the sock pattern this came with.